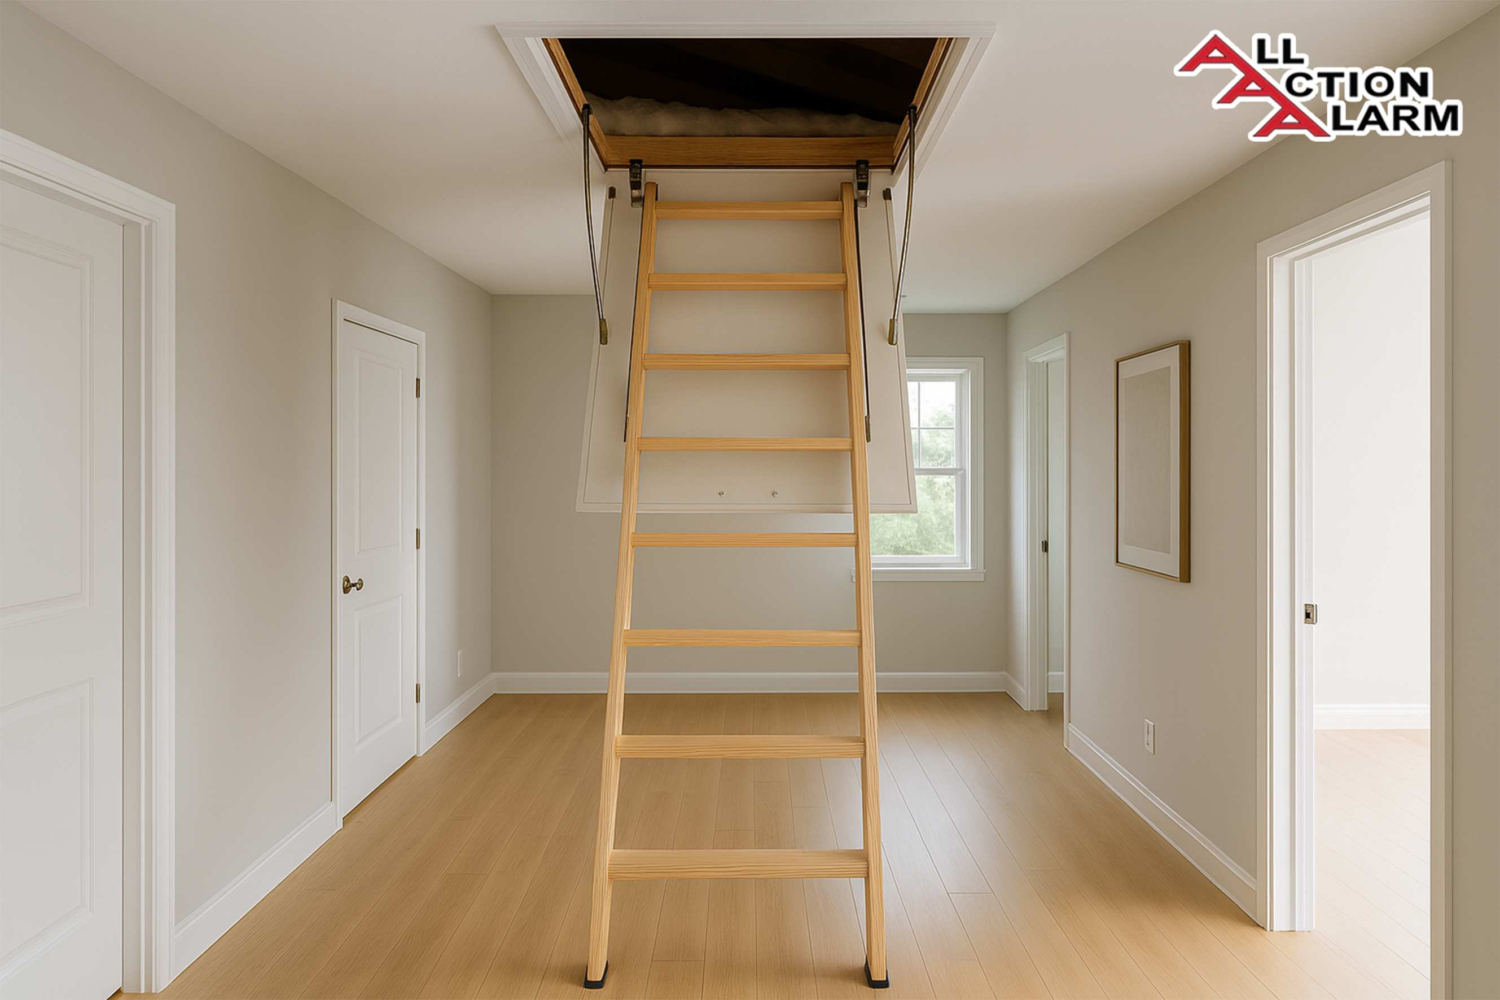
Attic Access Door
- Understanding Smart Video Clips in Home Surveillance - March 5, 2026
- Access Control Installation - March 2, 2026
- Fire Alarm Systems - February 27, 2026
Have you ever looked up at your ceiling and wondered what’s behind that small square or rectangular panel? That, my friend, is likely your attic access door—your entryway to an entire hidden world above your living space. Whether you need to store holiday decorations, inspect your insulation, or chase a weird noise in the night, that small opening is more important than you think.
Most people overlook their attic access door until there’s a problem—drafts, hard-to-open panels, or worse, safety hazards. But here’s the truth: your attic access door isn’t just a piece of wood or plastic stuck in your ceiling. It plays a crucial role in your home’s energy efficiency, safety, and functionality.
In this detailed guide, we’ll explore everything you need to know about attic access doors—from types and materials to installation tips and insulation tricks. We’ll even get into cost, maintenance, and some pretty smart safety tips. So, if you’re looking to install, upgrade, or simply understand that mysterious door to the top of your house, keep reading.
What Is an Attic Access Door?
Let’s start with the basics. An attic access door is an entry point that allows you to get into your attic space. It’s typically installed in the ceiling of a hallway, closet, or garage, depending on where your attic is located. The design can range from a simple scuttle hole with a panel cover to fully functional pull-down stairs or ladder systems.
Most attic doors are around 22.5 x 54 inches (standard size), but this can vary depending on your home’s design and whether you have a walkable attic or just crawl space. Some homes might have multiple attic doors, especially if the attic is divided by walls or rafters.
Why is it even there? Good question. Your attic access door is essential for:
-
Inspecting or repairing roof structures
-
Accessing electrical wiring, ductwork, or HVAC systems
-
Storing seasonal items or unused belongings
-
Monitoring for pests, mold, or moisture problems
It’s a functional gateway, but if ignored, it can also become a weak spot for drafts, insulation gaps, and even safety hazards. So the more you understand about it, the better you’ll be able to maintain it.
Different Types of Attic Access Doors
Not all attic doors are created equal. The type you choose will depend on your space, budget, and how often you plan to use the attic. Here are the most common types:
Hinged Attic Doors
These open like a regular door—hinged on one side and often secured with a latch or lock. They’re simple, and great for vertical wall installations in finished attics or garages.
Sliding Panel Doors
These are more common in tight spaces. A panel slides into the ceiling frame, offering access without needing clearance space for a door swing.
Drop-Down Attic Stairs
One of the most popular options. These doors come with collapsible staircases that fold into the ceiling when not in use. Ideal for regular access, especially if you store items in the attic.
Scuttle Hole Access Panels
The most basic and budget-friendly option. It’s a simple framed hole in the ceiling with a panel that lifts out. No bells or whistles here—just functional access.
Each type has its pros and cons. For instance, scuttle holes are cheap but can be drafty. Drop-down stairs are convenient but require maintenance and proper support. Knowing your needs helps you make the right call.
Choosing the Right Attic Access Door for Your Home
So, how do you choose? It depends on several factors:
-
How often will you use it? If you only go up once a year, a basic scuttle hole might work. If you’re up there every season, opt for stairs.
-
How much space do you have? Some attic staircases require 7–8 feet of clearance when extended.
-
What’s your ceiling height? Taller ceilings might need longer ladders or telescoping stairs.
-
Is insulation a concern? Absolutely. Poorly sealed attic doors are one of the biggest sources of energy loss in homes.
-
Will it support weight? If you’re going to carry boxes up and down, you’ll need a solid, secure system.
Small homes or condos might benefit from sliding or telescoping panels. Larger homes with high ceilings could benefit from aluminum pull-down stairs. And if you have a finished attic, a hinged or wall-mounted door might make more sense.
Popular Materials Used in Attic Access Doors
Attic doors come in a variety of materials, each with their own perks and downsides:
Wood
-
Pros: Strong, traditional look, good insulation value
-
Cons: Can warp with moisture, heavier, may require painting or sealing
Metal
-
Pros: Durable, fire-resistant, long-lasting
-
Cons: Can conduct heat/cold, may be noisy or heavier
Plastic/Composite
-
Pros: Lightweight, affordable, resistant to moisture
-
Cons: Not as durable, may crack over time
Choosing the right material depends on your climate, your home’s needs, and your budget. For example, in humid climates, plastic or composite may perform better. For fire safety or garage access, metal is often the top choice.
Pre-fabricated vs. Custom-Built Attic Doors
When it comes to attic access doors, you’ve got two choices: grab a ready-made unit or build something tailored to your home. So which one is better? Let’s break it down.
Pre-fabricated Attic Doors
These are store-bought kits you can find at most hardware stores or online. They come with all the pieces you need—frame, door, ladder (if it’s a pull-down unit), and sometimes even weatherstripping.
Advantages:
-
Affordable
-
Easy to install (especially for DIYers)
-
Standard sizing makes replacements easier
-
Often includes energy-efficient features
Drawbacks:
-
Limited customization
-
May not fit odd-sized ceilings or unique home layouts
Custom-Built Attic Doors
These are made to your specifications, either by a contractor or yourself if you’re handy with tools.
Advantages:
-
Perfect fit for non-standard spaces
-
Can choose materials, insulation, and features
-
Better aesthetics for upscale homes
Drawbacks:
-
Higher cost
-
Longer installation time
-
Requires skilled labor or advanced DIY skills
If your home has unusual framing or a custom design, go with a custom-built solution. But if you just want a quick, energy-efficient, and affordable upgrade, a pre-fab kit will do the job.
Where to Install an Attic Access Door
Before you cut a hole in your ceiling, it’s critical to choose the right location. Poor placement can make access inconvenient—or even dangerous.
Best Locations
-
Hallways – Central and usually unobstructed
-
Closets – Keeps the attic door hidden from view
-
Garages – Ideal for less-used attics or tool storage
-
Ceilings with open space below – For pull-down ladders, you’ll need clearance
Locations to Avoid
-
Above staircases or doorways (dangerous)
-
Tight corners or narrow hallways
-
Above plumbing or ductwork (you might block access or damage systems)
Also, don’t forget about load-bearing beams. If you’re cutting into the ceiling, avoid joists or major structural supports unless you know exactly what you’re doing (or are working with a contractor).
Make sure there’s enough headroom in the attic above the door. Nothing’s worse than crawling in through a perfectly cut hole just to bang your head on a rafter.
Step-by-Step: How to Install an Attic Access Door
Ready to roll up your sleeves? Installing an attic access door is a doable weekend project if you’ve got basic carpentry skills. Here’s how to do it:
Tools and Materials Needed
-
Measuring tape
-
Circular saw or reciprocating saw
-
Drill and screws
-
Framing lumber
-
Attic access door kit
-
Insulation (optional but recommended)
-
Safety gear (goggles, gloves, dust mask)
Installation Steps
-
Measure and Mark – Decide on the size and location. Mark the opening between joists.
-
Cut the Opening – Use your saw to cut a clean hole in the drywall or plaster ceiling.
-
Frame the Opening – Add support framing around the cut edges for structure.
-
Install the Door – Fit your attic access panel or ladder into the framed opening and secure it per the manufacturer’s instructions.
-
Seal the Edges – Add weather stripping or caulk to prevent air leaks.
-
Test for Stability – Make sure it opens, closes, and locks safely.
DIY vs. Hiring a Pro
If you’re unsure about cutting into your ceiling or working with ladders and framing, don’t risk it. A professional can usually install a pull-down attic ladder in 3–4 hours and ensure it’s safe and code-compliant.
Insulating Your Attic Access Door
Most attic access doors are huge energy losers. Think of it like a refrigerator with a loose door—it just leaks cold (or hot) air. Proper insulation is not optional; it’s essential.
Why It Matters
-
Prevents heat from escaping in winter
-
Keeps your home cooler in summer
-
Reduces HVAC workload and lowers energy bills
-
Helps meet building codes for energy efficiency
Best Insulation Materials
-
Rigid Foam Board – High R-value, easy to cut and install
-
Batt Insulation – Can be stapled to the back of the door
-
Spray Foam – Great for filling gaps around the frame
-
Insulated Covers – Prefab solutions that fit over attic ladders (like a tent)
Tips for Proper Insulation
-
Cut foam board to fit the back of the panel snugly
-
Use adhesive spray or foil tape to attach
-
Seal the perimeter with caulk or weather stripping
-
Add a reflective radiant barrier for extra heat resistance
A well-insulated attic door can have a dramatic impact on your home’s overall energy performance. You wouldn’t leave your front door open in the middle of winter—so why let your attic do that?
Air Sealing Around Attic Access Doors
Insulating the door is half the battle. The other half is air sealing the edges. Even the tiniest gaps around your attic access panel can leak conditioned air.
Common Air Leakage Points
-
Gaps between the attic frame and ceiling
-
Edges of the panel or ladder frame
-
Cracks in old or warped doors
Sealing Solutions
-
Weatherstripping – Apply foam tape or rubber seals around the frame
-
Caulking – Use paintable caulk for small cracks or joints
-
Foam Spray – Great for larger gaps but use sparingly
Pro Tip
Close the attic door and turn on a bathroom exhaust fan nearby. If the door flutters or you feel air movement, you’ve got leaks.
Sealing and insulating together can improve the R-value of your attic access point by 5–10x and can literally pay for itself in saved energy within a year.
Energy Efficiency and Attic Access
You may not think that small door in the ceiling has a big impact, but energy experts disagree. Attic access doors are one of the top 10 sources of air leakage in homes—right up there with windows and fireplaces.
Key Impacts
-
Cold air seeps into living space in winter
-
Hot attic air heats your home in summer
-
HVAC systems must work harder to compensate
-
Utility bills skyrocket
Energy Star Recommendations
-
Insulate to at least R-10 or higher
-
Air seal all perimeter gaps
-
Use insulated ladder tents or attic stair covers
-
Install a gasketed frame to reduce leakage
Upgrade Tip
If your attic door is older than 10–15 years, upgrading to an Energy Star-rated model can save you hundreds annually—especially if your HVAC system is in the attic.
Safety Considerations for Attic Access
We often think of attic access doors as simple entry points, but they can actually pose serious safety risks if not installed or maintained correctly. Whether you’re accessing the attic once a year or every weekend, safety should always come first.
Ladder Safety
If your attic access includes a fold-down or pull-down ladder, it’s critical to ensure it’s stable and rated for your weight plus any load you’re carrying.
-
Weight Rating: Always check the manufacturer’s label. Most attic ladders range from 200 to 375 pounds. Choose higher ratings for frequent use.
-
Secure Installation: Make sure the ladder is bolted firmly into the frame. Loose attachments can result in falls.
-
Stair Angle & Spacing: The treads should be evenly spaced and angled at about 60–70 degrees—not too steep.
And always climb facing the ladder, with three points of contact (two feet and a hand). Never carry heavy boxes while climbing—use a rope to hoist them if needed.
Fire-Rated Attic Doors
If your attic access is located in or near a garage or in a multi-family building, local codes may require a fire-rated door. These are specially designed to prevent flames and heat from passing through for a set amount of time (usually 30–60 minutes).
-
Look for UL or ASTM Ratings
-
Steel or special composite materials
-
Seal gaps with fire-rated caulk
Lighting & Visibility
Don’t be that person fumbling in a dark attic with a flashlight between your teeth. Install proper lighting at the attic entry point, and consider adding a motion-sensor light inside the attic for safety.
Other Safety Tips
-
Never step between joists—always step on flooring or decking
-
Watch out for nails sticking through the roof deck
-
Be cautious of exposed wiring or insulation (especially older homes with vermiculite, which may contain asbestos)
Accidents in attics happen more often than you think. A simple misstep can lead to broken bones or worse. Treat your attic access with the same level of safety as any staircase or ladder in your home.
Upgrading an Existing Attic Access Door
Still using that 20-year-old creaky ladder with zero insulation? It might be time for an upgrade. A modern attic access system doesn’t just look better—it performs better, too.
Signs It’s Time to Upgrade
-
Air drafts coming through the door
-
Ladder is wobbly, creaky, or missing steps
-
Door won’t close flush or locks are broken
-
No insulation or gasket sealing
-
Visible mold, sagging, or warping in wood components
Upgrade Options
-
Insulated Pull-Down Stairs: Add thermal resistance and smoother operation
-
Telescoping Ladders: Great for tight spaces and minimal visual impact
-
Hinged Wall Doors: Best for finished attic conversions
-
Automatic Lift Systems: High-end solution with electric operation
Retrofitting Tips
If you’re not ready for a full replacement, consider retrofitting:
-
Add an attic stair insulation cover (like an attic tent)
-
Install foam board on the back of the existing panel
-
Replace weatherstripping or gaskets
-
Add extra framing for better support
An attic upgrade pays off in more than just comfort—it adds to your home’s value, improves energy efficiency, and makes the space safer and more functional.
Cost Breakdown: What to Expect
One of the most common questions homeowners ask is: How much does it cost to install or upgrade an attic access door? The answer depends on the type of door, material, and whether you’re going the DIY route or hiring a professional.
Typical Cost Ranges
| Item/Service | DIY Cost | Pro Installation Cost |
|---|---|---|
| Basic scuttle hole panel | $30–$70 | $150–$300 |
| Pull-down attic stairs (wood) | $150–$250 | $400–$800 |
| Aluminum pull-down stairs | $250–$400 | $600–$1,000 |
| Fire-rated access door | $300–$500 | $800–$1,200 |
| Insulated attic tent | $50–$150 | $100–$300 |
| Custom-built attic door | Varies ($500+) | $1,000–$2,500 |
Other Factors
-
Location of the attic (first or second floor)
-
Ceiling height and framing complexity
-
Finishing and trim work
-
Disposal of old door/ladders
ROI & Energy Savings
A properly sealed and insulated attic door can save between 10–25% on heating and cooling costs annually. Depending on your climate, the investment often pays for itself in 1–3 years.
Maintenance Tips for Long-Term Performance
Once your attic access door is installed, you can’t just forget about it. Regular maintenance ensures safety, energy efficiency, and longer lifespan.
Monthly or Seasonal Checks
-
Open and close the door to check for smooth operation
-
Inspect ladder hinges and fasteners
-
Look for signs of drafts or insulation shifting
-
Test the lock or latch mechanism
Annual Maintenance Tasks
-
Reseal any worn-out weather stripping
-
Reapply caulk around framing if cracked
-
Tighten bolts or replace worn-out screws
-
Clean or replace insulation if damaged
Pro Tip
Lubricate the hinges and joints of fold-down ladders with a silicone-based spray once or twice a year to avoid squeaks and rust.
Cleaning Tips
-
Vacuum around the door to remove dust and debris
-
Use a damp cloth for plastic or metal panels
-
Avoid using water on unsealed wood (it can warp)
Taking care of your attic door is like taking care of any other door in your house. A little attention goes a long way toward performance and durability.
Common Problems and Fixes
Even the best attic access doors can develop issues. Here are some common problems and how to fix them without calling in a contractor.
1. Drafts Around the Door
Cause: Poor sealing or worn insulation
Fix: Replace weather stripping, add foam insulation, or install an attic stair cover.
2. Sticking or Hard-to-Open Door
Cause: Warped wood or misaligned framing
Fix: Sand the edges, adjust the latch, or realign the frame.
3. Wobbly Ladder
Cause: Loose screws or weak floor support
Fix: Tighten all hardware and add additional bracing.
4. Mold or Mildew
Cause: Condensation or poor ventilation
Fix: Improve attic airflow, use mold-resistant insulation, and seal the panel properly.
5. Noisy Ladder Operation
Cause: Lack of lubrication or loose bolts
Fix: Apply silicone spray to all moving parts and tighten the fasteners.
Don’t ignore these little warning signs. Fixing them early can prevent bigger (and more expensive) problems down the line.
Final Thoughts
Your attic access door might be small, but its role in your home is anything but. From providing essential access to hidden storage or HVAC systems to playing a key role in your home’s energy performance, it’s a part of your house that deserves attention.
Choosing the right door, installing it safely, and maintaining it properly can make a world of difference—not just in convenience, but also in safety, utility bills, and overall comfort.
So don’t overlook that square in the ceiling. Embrace it. Upgrade it. Insulate it. And most importantly, make it work for you instead of against you.
FAQs
1. Can I install an attic access door myself?
Yes, if you’re comfortable with basic tools and framing, a DIY install is possible. However, for pull-down stairs or complex framing, hiring a pro is safer and ensures code compliance.
2. How big should my attic access door be?
The standard size is 22.5 x 54 inches, but this can vary. Check your local codes and your attic’s layout for the best fit.
3. Do I need a permit to install an attic access door?
In many areas, yes—especially if you’re altering framing or installing stairs. Check with your local building department.
4. How do I make my attic access door more energy-efficient?
Insulate the panel, seal the edges with weather stripping, and consider an attic stair cover to minimize air leakage.
5. Is it safe to store items near the attic access?
Yes, but keep the area directly around the entryway clear for easy and safe access. Always store on solid flooring, not between joists.
About All Action Alarm: Your Trusted Partner in Home Security Solutions
When it comes to protecting your home and loved ones, there’s no room for compromise. At All Action Alarm, we take home security to the next level by offering top-tier protection with cutting-edge technology and expert monitoring services that you can rely on. As a leader in the security industry, we’re committed to keeping homes and businesses safe, providing peace of mind 24/7.
Check out Home Automation Systems and Get Started with All Action Alarm Today!
Don’t wait for an emergency to take action. Protect your home and family with the best in the business. Call (631) 549-7225 to schedule your consultation, or visit allactionalarm.com to learn more about our services.
Your safety is our top priority.

